Showing posts with label Not the house. Show all posts

Tuesday, August 26, 2014

Pickled Beets

I got a surprise 25# of organic beets last Thursday, they were dirt cheap so I couldn't say no. Only a few people here like pickled beets, so I'm canning them in half pints this year. I pulled this recipe from my old blog, back when we lived in Ohio, grew heirloom beets and Abby was only 4. How time flies.


WEDNESDAY, JULY 28, 2010

A Busy Day in the Kitchen

We've had a busy week in the kitchen putting things into canning jars. Hot, tiring work to be sure, but I know the reward will be worth it. Katie canned a canner load of Rattlesnake pole beans this morning, our first of the year. I was working on Rebekah's birthday presents while she did that and then we canned blueberries and pickled heirloom beets this afternoon/evening. Our beet varieties are: Chioggia, Golden, Lutz Winter Keeper. I don't think I'm a huge pickled beet fan, but they will add variety to the dullness of Winter's protein-heavy repast. I think we're about finished with the blueberries, I ought to make more syrup since what I did make is making its way to New York before long and I have none left for us. We'll see, I know we'll be elbow deep in peaches tomorrow and/or Friday and I don't want to bite off too much. This is our Pickled Beet recipe, it's from 1911.
-------------------------------------------------------------------------
Pickled Heirloom Beets
1. Wash beets and trim off beet greens. Dispatch a child to feed the greens to the pigs; meanwhile leave roots and 1 inch of stems and cook until tender, about a half hour more or less.
Drain beets, cool and peel. Next, admire them on the plate.
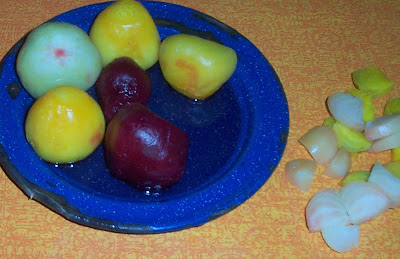
2. Cut into slices or cubes, place in jars and pack them in but don'tcrush them. Then admire them some more and call all of the children in to remark on the pleasing aesthetics that beets entail.
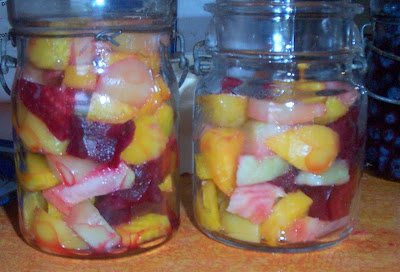
3. In a separate kettle combine: 4 cups cider vinegar, 2 cups brown sugar, 2 cups water, 1.5 teaspoons canning salt, and in a spice bag put 2 cinnamon sticks, 12 whole cloves and 1 teaspoon whole allspice. Add spice bag to vinegar/sugar and boil for 5 minutes or the amount of time that it takes a 4 year old to tell you about the presents that she wants for her birthday which is still 4 months away. Remove spice bag and ladle syrup over beets in jars.
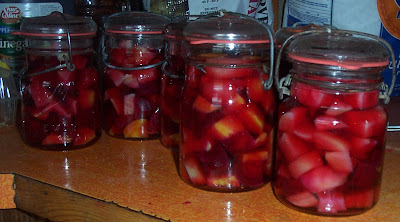
4. Put bands and lids in place and can in a boiling water bath canner for a half hour. Watch the storm roll in as you frantically grab the laundry from the clothesline with clothes pins flying every which way. Let it occur to you at 5:30 that you have nothing prepared for Supper and call for pizza.
Be thankful for everything that was accomplished in a day's time and doubly thankful that every day isn't like today. :-D

Saturday, July 26, 2014

Apricot-Vanilla Bean Jam


I just made the best jam that I've ever tasted and wanted to get the recipe written down before I forgot what I did. To make it you will need:

  • 6 cups of diced apricots including the skins
  • Combine with 1 shredded Granny Smith apple and the zest of 1 lemon and the juice of the lemon. 
  • Add 1 whole vanilla bean 
  • 3 cups sugar
Stir thoroughly and allow to rest until very juicy. For my warm kitchen this took 2 hours.

Remove vanilla bean, rinse, split lengthwise and scrape seeds into fruit. Throw the split bean back in along with 3 pits. 

Cook over medium heat until it tests done, this doesn't take long.

Put into jam into jars adding 1 pit to each jar.

Allow 1/2" headspace and process for 10 minutes.

Yield: 3 pints

Thursday, July 24, 2014

The Economics of Canning

I was talking to a friend this week and telling her that this year I'm doing a jar by jar analysis of what my home canned food costs. So far I haven't canned anything that I could have bought cheaper, matching quality for quality (and that's an important distinction.) I wrote this article four years ago for Farming Magazine and put it on my old blog, here it is again still as relevant as it was then.

TUESDAY, JUNE 8, 2010


It Pays To Can!

This is my most recent Farming Magazine artice, it will be in the Fall issue, enjoy!


Home Canning Saves Money
I was sharing our food philosophy recently when a man piped up and dogmatically stated that home canning is a nice hobby but “you’re never going to save money doing it!” He went on to say that he bought his canned goods by the case load from Save-A-Lot and $.40 a can was cheaper than any home canned goods could ever be (needless to say, he isn’t a Farming magazine reader :-)). So, does home canning really save money? Let’s look at the facts. A typical 600 square foot garden will yield, on average, one pound of vegetables per square foot. Seeds, plants, fertilizer and tools cost approximately $60 amortized over 5 years, using these figures brings the cost of raising vegetables to 10¢ per pound. Obviously if you buy direct from growers or at pick-your-own farms the price is somewhat higher. Canning jars purchased new cost about $8 per dozen, amortized over 20 years brings their cost to 3¢ per jar per year, add the cost of lids (which shouldn’t be reused) and the cost for jar, band and lid is 20¢. Figuring 2 pounds of vegetable in each quart jar brings the grand total to 40¢ per jar, so indeed, canning does “pay”.
Home Canning Assures Quality
Home preservation of food also assures that my family is eating the quality of food that is important to me. Pork raised in China, fed on human waste, at bargain basement prices from my local mega-mart food chain might seem like a thrifty purchase until you factor in the real cost. Some people don’t mind, but I do. Likewise, we raise or buy locally our own vegetables; what goes into my canning jars is naturally grown, non GMO wholesomeness. It hasn’t gobbled up fossil fuels by flying 2000 miles across the country before hitting my plate, in all probability it was picked only hours before we ate it or put it into jars to enjoy this Winter.
What About The Value Of My Time?
Farm wives of a generation or 2 ago didn’t view home canning as a separate, optional activity apart from their regular duties. It was taken for granted that if you wanted to eat in the winter then you worked to preserve the harvest in the summer. The old farm families never accounted for their time or what it was worth. Only today, the modern woman, city dwellers or those new to the homesteading way of life do that. It’s part of the city mentality (and Marxist “labor theory of value”) that they cannot get past the fact that their time is worth money. Back to the 40¢ canned vegetables that my friend buys, why doesn’t he factor in the time he spends in the car and the store plus the gas money he spent to get there? The true cost of the 40¢ can is the number we should really be using for an honest comparison. From all angles home preservation is the healthiest, most economical, environmentally friendly way you can feed your family!
The 13 jars of strawberry jam that we canned yesterday. I do all of my jam in bail lid jars, I only wish I had more! I have never, ever had a seal failure with bail lids, but I've certainly had plenty with regular lids. The lids today are made so cheaply (like everything else) compared to lids 20 years ago and I think that's why they fail so often. I want to try these lids.
I am canning lemonade concentrate today, it's on sale locally and will be a nice treat this winter.

Tuesday, July 15, 2014

Food In Jars

This has been a full week already of canning, the busy time is definitely upon us. I was looking through the Complete Book of Home Preserving to find a pickle recipe and instead stumbled up a recipe for Thai Hot & Sweet Dipping Sauce.


I made the recipe according to the directions and the results were OK, but could be so much better with some tweaking. I added orange juice concentrate and some ginger & horseradish and now it is superb! The kitchen smelled like a Chinese restaurant.  :)
Here is my version which I guess we'll call Spicy Orange Sauce:
3/4 cup minced garlic
1T salt
6 cups cider vinegar
6 cups sugar
a heaping 1/4 cup of hot pepper flakes
2T shredded ginger
2T prepared horseradish
2 12 ounce cans of orange juice concentrate (don't reconstitute)

Cook all together until sugar is dissolved, leave 1/2" headspace, can for 15 minutes. I added a jar to some chicken and threw it in the crockpot and then thickened the sauce after it was fully cooked. Mmm!


Next we made 2 batches of canned coleslaw. I actually think this tastes more like eggroll filling, but whatever, the children love it!
Combine: 3 cups vinegar
4 cups sugar
1t celery seed
1t mustard seed
4t salt and heat until sugar is dissolved. Let cool

In a big mixing bowl shred 1 lg head of cabbage (I prefer 1 small green & 1 small red)
1 cup shredded celery (or you can dice it)
1/2 cup shredded/diced onion
2 cups shredded carrots
Mix together and fill jars, don't pack them but don't underfill either, leave an inch headspace. Top with vinegar mixture, leave 1/2" headspace, remove bubbles & can for 10 minutes.


Lastly, I made a batch of blueberry jam with homemade pectin. I'll quickly cover how to make your own pectin. Take 5 Granny Smith apples and 2 lemons (for blueberry jam substitute 1 lime), quarter them but don't peel, place in pot with as little water as you can use to keep them from scorching. Cook until soft and run through Victorio Strainer. Add puree to your fruit & sugar and cook until done. The benefit of jam prepared this way, other than that it doesn't use nasty commercial pectin, is that should the jars come unsealed the jam won't mold. Sugar acts as a preservative. I know some people that don't even waterbath their jars, but I do for 10 minutes. Don't forget to add some vinegar to your canner to keep the white sediment off the jars!

Monday, June 30, 2014

Chickpea Tabbouleh


Tonight for supper I made chickpea tabbouleh which we ate in wraps along with shredded chicken. It was *so* good that I decided to save the recipe here.
2 16 ounce cans of chickpeas, drained
2 large tomatoes, chopped
1 red bell pepper, chopped
5 radishes, chopped or shredded
1 cup chopped fresh parsley
½ cup chopped green onions
3 tablespoons olive oil
3 tablespoons lemon juice
½ teaspoon salt
¼ teaspoon ground pepper
Mash the chickpeas until 3/4 are broken up, add the rest of the vegetables and mix well. Add the salt & pepper, mix again. Drizzle the olive oil and lemon juice over and mix for the last time. 
The recipe made enough for us to have for supper with leftovers for lunch tomorrow. It has got to be one of the most economical wholesome meals I've ever tried. I spent less than $12 total!

Sunday, April 27, 2014

Welcome to your Really Old House

I saw this in Yankee magazine and thought it was cute. And so true!


Congratulations! As the proud new owner of a vintage New England home, you can look forward to many years of satisfaction, enjoyment, and repairs.
Steep Thrills
Note the daring slope of the roof, which has approximately the same pitch as Tuckerman Ravine and will get you to the bottom just as fast in case of emergency. A built-in snow-removal system uses heat from the house to melt the white stuff and transform it into those charming full-length icicles featured on New England calendars. (See Appendix B: “Ice Dams.”)
Boxed In
The attic of your old house comes pre-filled with ancient furniture, clothes, and trunks. Don’t worry, none of it’s valuable–your junk will fit right in! The attic is climate-controlled to be an oven in summer and a freezer in winter, just as nature intended.
Rooms with a Flue
Your brick chimney was designed to let small animals come and go at their leisure, providing you with many happy evenings playing “What’s That Noise?”
Breezy Does It
You’ll enjoy fresh air year-round, thanks to patented Flo-Thru technology, consisting of hundreds of tiny air leaks strategically placed around windows, doors, and other openings. Many of these gaps are large enough to let insects pass through, bringing the wonder of nature right into your home.
Hidden Turn-Ons
Light switches in new houses are generally placed just inside entry doors–boring! You’ll find your light switches outside the door, down the hall, and possibly in your neighbor’s broom closet.
Privy Counsel
You’ll enjoy the luxury of 1-1/4 baths (the downstairs toilet was originally an ironing-board closet). The main bath features a clawfoot tub that your friends will ooh and aah over but will not take off your hands, as it weighs only slightly less than the Hoover Dam. There’s no shower, but you can easily add one using a variety of contraptions, most of which will also add a refreshing moistness to the walls and floors.
Wall or Nothing
The walls of your home have been filled with old newspapers that provide an insulating R-value of 0.0002, largely owing to the use of words like “coruscate” and “perspicuous” in the text. The surface is genuine horsehair plaster, noted for its attractiveness, durability, and tendency to crumble to pieces if you try to hammer a picture hanger into it.
Floor Better or Worse
Luxuriate in the warmth and beauty of genuine hardwood floors. They’re guaranteed to be maintenance-free, as long as you don’t care what they look like. They also act as built-in hygrometers, alerting you to excess humidity by popping up high enough to stub a toe on.
Cellar Beware
Your New England cellar is a haven of dampness, coolness, and mold spores the size of rutabagas. Unlike modern basements with their tediously straight angles and smooth walls, your cellar incorporates features of its natural surroundings, such as boulders, ledges, and major root systems. In places, the cellar is actually large enough to let you stand up straight, though generally not where you need to access wires or pipes for repairs. Here, you’ll find handy crawl spaces, home to a variety of interesting creatures, including spiders resembling mohair work gloves. After a long winter, the sound of running water will alert you to the arrival of spring as it passes through your cellar.
The Heat Goes On … and On … and On
Your old house comes equipped with an original furnace the size of a Winnebago. This classic heap o’ technology fires up with a house-rattling roar just a few decibels shy of a space-shuttle launch, giving you the calm assurance that it’s working day and night. Heat is delivered through a single vent to the living room, where it’s free to roam the rest of the house, though it rarely feels called upon to do so. In later models, heat may be provided via iron radiators, which can also be used as anchors by any Class 2 cargo ship.

Sunday, February 16, 2014

It Came Upon The Middle Of February

For various and sundry reasons we did not celebrate Christmas this past December. When we were finally ready to celebrate the availability of trees was rather....limited, so I decided we would do something totally different from your typical Christmas tree. I decided to make it a permanent reminder of our first Christmas in the new house, something that furthers my vision for what I want to transform this property into. I chose an American Crabapple tree. It arrived on Saturday, I stuck it in a sap bucket, very simply decorated it and opened presents Sunday morning. Then out the tree went. We will plant it tomorrow I think, 2 other apple varieties will join it later in anticipation of the day that we can press our own apples.
 We already have 2 blueberry bushes planted and loads of garlic. A raspberry bush or two will join the other bushes and some strawberries in a raised bed. The planning and planting alike make me so happy, I'm thrilled to be getting back portions of our former life that I've missed.

Afterward we went to a restaurant to eat, a very, very rare treat for our family. The owner and several waitresses came over to inquire whether they were all our children and to ask what their ages were. Later the owner came back to tell us what a wonderful family we had and to compliment us on how well behaved and quiet they were.  :-)  That makes me happy too.

 
Christmas is a very low key day for us, simple and family oriented, just the way I like.
.

Tuesday, January 21, 2014

Maple & Honey Coulommiers

Since work on the house has pretty much come to a standstill for the "Winter" (30-40 degrees and rain seems like perpetual Spring to us) I decided that now would be a good time to dust off the cheese making supplies and get at it. One of our very favorite cheeses is Coulommiers, a cheese in the Brie/Camembert family. Three of my friends requested a tutorial, so this is for you Amy, Jenny and Ken. 

A few notes. This is the first time I've ever made a cheese from pasteurized milk and I know that it will give a softer set. I figured that since this is a semi-soft cheese that it shouldn't matter too much; the cheese was notably softer, but still fine. Second, I found vegetable rennet locally so I used that. Since it was expired (didn't check that until I got it home) and presumably weaker in strength that may have contributed to a softer cheese as well. Third, I added 1t of maple extract and 3T of honey to the milk, I've never added a liquid before and that may also have contributed to a softer cheese. If I would try it again I'd add dehydrated honey. Fourth, my cheese thermometer broke and I sent Gill for a candy thermometer. It was useless for this recipe so I guesstimated the temperature. Fifth, the book says to never directly heat the milk, but I always do. It works out. And lastly, there is both science and art to cheese making. I get the science, but prefer the art. My directions will frustrate you if you are a "follow directions" kind of person.  :-)

Step 1, heat the milk to 90 degrees. Since the lowest temperature on the candy thermometer is 100 I kept it below that and heated the milk until it felt blood warm.

Step 2, Add 1/8 teaspoon of Flora Danica starter, stir well, cover and allow milk to ripen for 20 minutes.

If you want to add herbs or honey or whatever, do it now. Generally when I make this I add chives, onion powder and garlic powder. It is sublime

Step 3, Dilute 2 drops of rennet in 1T of cool, unchlorinated water. Add rennet to milk and stir well. The recipe says cover and let set at 90 degrees for 45 minutes, I put a lid on the pan and put it in the oven.

Step 4, Place a cheese mat on a cookie sheet with one end of the sheet raised a bit. Put cheese mold on top.

Step 5, HOLDING THE MOLD WITH 1 HAND! and using a metal serving spoon, slice thin slices of curd from the top and gently place in mold. Don't sweat it if they just plop in, it'll still be fine.

Step 6,  Ladle in all curds, the mold will be filled to the top. Place a weight on top, I used a small cast iron frying pan.

Step 7, Let cheese set at 72 degrees (ha ha, I just left it on the counter overnight) for 6-9 hours. Whey will be draining all over your counter and onto the floor.

Step 8, You are now ready to flip the cheese. Take a length of dental floss and run it under the cheese so it won't be attached to the mat.

Step 9, Flip the cheese onto a fresh mat and continue to let it drain and settle.

Step 10, Flip cheese several times a day. The cheese is done when it stands an inch to an inch and a half high and pulls away from the sides of the mold. You can eat it right away or wrap it in cheese wrap and age for a week or two. The aging gives it a bit of a wang, for wangless cheese eat immediately.

Thursday, November 14, 2013

It's beginning to smell a lot like cranberry sauce

When the cooler weather comes and we begin spending the majority of our time indoors, I begin to think about cooking some seasonal favorites that we haven't tasted since last year. Our family loves cranberry sauce, I mean they would eat it daily if I made it. Store bought cranberry sauce is like apple sauce, they can take it or leave it, but homemade they love. I prefer homemade anyway, I enjoy the luxury of knowing that I'm feeding them wholesome food without high fructose corn syrup and other junk. My recipe uses apples, it boosts the nutritional value and increases yield too, which is a nice bonus.
To begin wash 3 bags of cranberries (12 ounces each). Place in a large pot and add 6 cups of sugar and 4 1/2 cups water.


Wash and shred 6 apples, I used Winesap because I still have a bushel left after making all the applesauce we wanted. I ended up canning 72 quarts of sauce.


Cook over medium high heat until all berries burst, apples are tender and it passes the sheeting test. OK, truthfully I don't do the sheeting test. I just cook and stir and taste until it seems done enough and then worry constantly that I messed it up. But that's me.


Place in pint jars leaving 1/2 inch headspace and can for 15 minutes. Yield: 7 pints for a cost of less than $2/jar if you buy cranberries for $2/bag like I did. I want to make another 3 batches at least.


In other homey news, Gill and the boys got a patch of ground cleared enough to plant the garlic I've been saving. We put 175 cloves in the ground. I can't wait to harvest ours and quit buying the bleached Chinese garbage that I was using.

Tuesday, November 5, 2013

Applesauce!

Scenery on the way

Gill and I just celebrated our 23rd wedding anniversary (!) and when he asked me what I wanted to do I told him that I really wanted to go to the orchard and get apples. We headed down to Cosby, visited 2 different orchards and came home with 7+ bushels of apples. I chose 2 bushels each of Winesap and Granny Smith and 1 bushel of: Jonathan, Rome and Mountain York. We also picked up a peck of Arkansas Black and another of Cameo, 2 varieties that were new to us.

And, I also picked up some pears, at $.50 a pound I just couldn't resist.  :-)   My plan is to sauce most of the apples, the children eat a few every day and we'll bake with some, but the lion's share will go into jars. I've really missed canning this summer and am thrilled to be back at it. This is how I sauce this many apples without killing myself.

1) Wash apples and rinse. Cut apples into quarters and throw in a large stockpot. Seeds, skins, stems, all of it.

2) Add enough water to not scorch apples, but not too much as to make the applesauce soupy.

3) Cook until the apples are fork tender. It won't look anything like applesauce yet. Don't panic.
Fork tender apples

4) Run the whole mess through a Victorio Strainer. Honestly, this was the single best kitchen gadget I ever bought. It's worth its weight in gold.


5) Add sugar and cinnamon to taste. Can for 25 minutes in a waterbath canner.

For the first batch I put in 42 apples and got 9 quarts of sauce. It was a bit soupy as you can see in these pictures. I don't mind that because we bake with it as well as eat it. For the second batch I got 7 quarts of much thicker sauce from the same amount of apples.